When you click on the Register Book sub-tab of the Printing Tab, this window will be displayed.
Show Alignment Borders is a Check Box. Placing a check here will cause boxes to print around your cards. You wouldn't normally do this when you were actually printing to your Register Book Card Stock, but sometimes the boxes are useful when you print to a plain piece of paper or wish to adjust margins.
The List field that initially displays "6.5 x 9" is the Paper Size List. Both of the standard book sizes are on the list. In addition there is a Custom Card Size choice which when selected allows you to use the Card Stock Button at the right of the screen to specify a custom configuration.
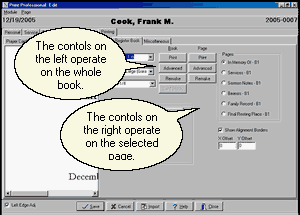
The Select Fonts List specifies the Font Set and Select Book specifies the Book Set List. We have preconfigured a number of Sets that we think are attractive but you may create more using the Advanced Button. Actually there are two Advanced Buttons for Register Books. On the left is a Button for the Book which lets you name the pages to be included, and on the right is a Button for the selected Page which lets you define the information that appears on it.
Fonts Sets are described with names like Old English Small(OldEnglish) or Bold-Old English Small(Opulent Bold-OldEnglish). In the first example, all of the printing is in an Old English font in a small size. Normally you would want a extra large size for Register Books. The program will shrink a large font to avoid overflowing a card but will not expand a small font; it does, however, adjust spacing between sections to even out white space. The second OldEnglish in parentheses is the actual name of the font. In the second example, two fonts are listed. The first font, Bold, indicates the font for headings while the second font, Old English, is for the data. In parentheses we see that the actual name for what we are calling Bold is Opulent Bold.
The predefined Books are Blank Pages, Centered Titles, and Left Titles. Blank Pages prints the entire page including the Title at the top. Centered Titles assumes that the top heading is centered and centers the data below it. Left Titles assumes that the top heading is at the left and aligns the data to the left as well. All of these sets are for "computer interiors". If you have books that have preprinted lines for typewriters, you should contact your book company and ask about exchanging the pages for computer interiors. Most suppliers will do this at no charge.
Do not use a Data Set that includes a picture when you choose a Layout Set with a Background. If you want to have a picture of the deceased appear over a background, choose a Data Set with just text and choose a Layout Set with both a background and a foreground picture. Adjust the Text Margins and the Foreground Picture position so that the text and the picture do not overlap. Checking Show Alignment Borders will draw boxes to aid in making these measurements.
When you return to a Funeral, the window will display the book as you last printed it. You will be able to print more by simply clicking on Print. If you've made changes in the data though, you'll first need to click on the Remake Button to have the program recreate the card with the changed data. Changing Items on this windows such as the Font Set will also cause the card to remake. Note that there are two Remake Buttons, one for the whole book and one for the selected page.
The Resizing Controls allow you to fine tune the spacing. When the book is as you wish, click Print. You may print the whole book by clicking on the Print button in the left column or a single page by clicking in the right column and the Printer Window will appear.